Author Archives: karl.kranich

DotNetNuke Active Directory Login Error

DotNetNukeThanks to some people on the DNN Forums, I discovered that the Windows login error “Login Failed. Please remember that passwords are case sensitive” can also mean “you typed your Windows password correctly, but it’s shorter than the DNN default minimum password length of 7”.

The situation was confusing, because some people could log in with their Windows credentials, but others couldn’t.

Either ask your user to change their password to something at least 7 characters long (which is obviously the right way to go), or change the default minimum password length in web.config.  The parameter there is “minRequiredPasswordLength”.

Awesome Drop: An Awesome Android App

Awesome DropAwesome Drop is cool.  You want to copy some files to your Android phone, but don’ t have a cable handy.  Browse for the Awesome Drop app in the Android Market.  Install it an run it.  It tells you the URL and code to enter in Chrome on your computer (it uses some HTML 5 features that are probably only in Chrome right now).  Drag your files onto the browser window, and they’re automagically transferred to your phone!

Customizing the DotNetNuke login page

I’ve been wanting to change some things about how our DotNetNuke Intranet site’s login page works, so here’s my record of what I did.  I’m mainly writing this so that I’ll be able to reproduce it when I need to.

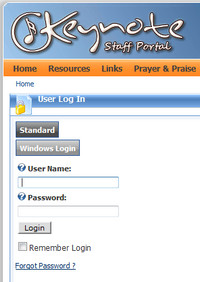
The default login page is shown at left.  I don’t like how the buttons are stacked, I’d like to add some hints for users about how to use the Windows Login, and I’d ideally like people to be able to hit <enter> when they’re using Windows Login.  I doubt I’ll figure that last one out before publishing this post.  Right now, you can hit <enter> when using the Standard login, but hitting <enter> with Windows Login causes a “Login failed” message.  I’m guessing that the <enter> is triggering a hidden Standard login button instead of the visible Windows login button.

Step 1: Create a new login page so that other content can be added more easily

Following the tips at dnngallery.net, I created a new page, added the Account Login module, and changed the Site Settings so that this page is the Login Page for the site.

Step 2: Reformat the login module

Since we’re allowing Standard and Windows logins, we need to edit two different Login.ascx files: one in DesktopModules\AuthenticationServices\DNN, and one in AuthenticationServices\ActiveDirectory.  I changed the table width to 240, aligned the Windows login parts to the left to match the Standard login, and added helptext = “” to the labels to get rid of the little help icons (I found that tip here).

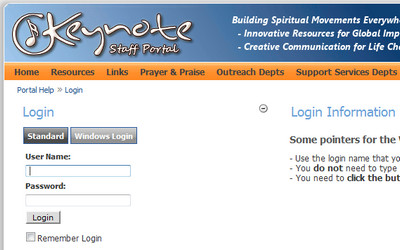
I also wanted it to be more obvious when someone clicked on Windows Login, so I edited AuthenticationServices\ActiveDirectory\App_LocalResources\Login.ascx.resx to change the label on the User Name box to “Keynote User Name” and the label on the button to “Windows Login”.

Step 3: Add other content to the page

I added a text/html module to the page with some login tips.

Here’s the final result:
Media Center 7 “problem” solved

I’m still on the Windows 7 Media Center journey that I started describing earlier.  With the addition of an IR Blaster I can now get through the channel setup and record from cable.  I don’t see the listings again for my antenna, but that will have to wait.

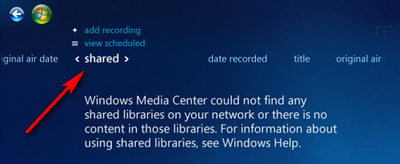
The latest issue is that it appeared that my Recorded TV was gone.  I could see the files through Windows Explorer and even double-click on them to play them, but when I would choose “Recorded TV” in Media Center, it would look like there wasn’t anything there.  The error message said “Windows Media Center could not find any shared libraries on your network or there is no content in those libraries …”

I finally realized that the “Sort by” tool at the top had gotten moved to “Shared”.  Of course, I don’t have any recorded TV shared from other machines, so the list is blank:

MC Error

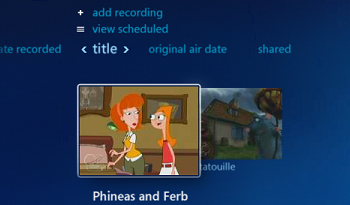
All we had to do was change that indicator at the top to any other sort method, and the programs appeared.  Duh!

MC Sorting

JW Player, Amazon Cloudfront, and playlists

[update: JW Player has some nice instructions on how to use the player with CloudFront.  But it doesn’t clarify the interaction with playlists…]

I have some flv videos that I need to make available to our staff, and I don’t want to put them on a public site like YouTube.  I’m new at hosting streaming videos, and didn’t realize that people won’t be able to skip around in the video unless the server supports RTMP streaming or you figure out “PHP fake streaming”.

Then I found that Amazon CloudFront supports RTMP.  It’s pretty easy to set it up, until I started working with playlists.  I wanted people to be able to choose between four different videos in a single player.  It took quite a bit of experimentation to get the configuration parameters correct.  Here are the steps:

  1. Sign up for Amazon Simple Storage Service (S3), create a “bucket”, and upload your flv videos.  Set the permissions on the files to allow everyone to open/download.  I also created a folder called “videos” to keep things organized.  Let’s assume that we have “video1.flv” and “video2.flv” in the folder “videos”.  These files can be accessed with links like
    http://s3.amazonaws.com/bucketname/videos/video1.flv
  2. Get the JW Player and upload the files to your S3 bucket.  I put them in a folder called “player”.
  3. Sign up for Amazon Cloudfront from the AWS console and create a Distribution, Delivery Method = Streaming, that points to your S3 bucket.  Your distribution will have a domain name like s1234567890123.cloudfront.net.
  4. At this point you can test everything by using the JW Player Setup Wizard.  Change height and width in “Embed parameters” to match your video.  Change file in “File properties” to “videos/video1.flv”.  Change streamer in “External Communication” to “rtmp://s1234567890123.cloudfront.net/cfx/st” (note the added “cfx/st”.  Now you should be able to click the Update/Preview link and try out your settings.  The code can be copied into an html file (like “cloudtest.html”), the html uploaded into the player folder, and then you can browse to
    http://s3.amazonaws.com/bucketname/player/cloudtest.html

    for the next test.

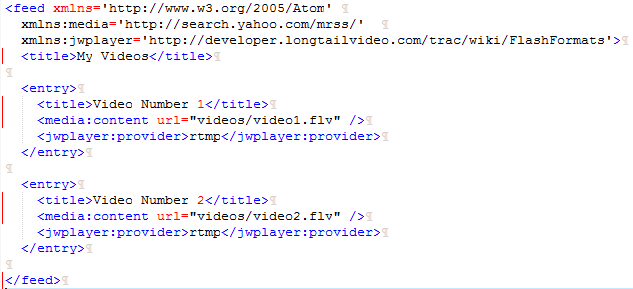
The next step is to build a playlist file that will let people choose from several videos.  The JW Player documentation here shows that you can choose from several XML feed formats.  I threw a dart at the wall and chose ATOM.  The only information that I wanted to include was the video title and the URL to the flv file.  The trick is figuring out what pieces of the RTMP path, file path, and file name go in what places.

Here’s what worked for me.  The folder and file name go into the playlist file, along with the “provider” type of rtmp:

The Amazon CloudFront RTMP path goes into the player configuration in your html file:

Note some other aspects of the html:  the height needs to be increased to make room for the playlist.  Also, the full path to the playlist needs to be specified.

Hopefully this will help you work through the process faster than I did!

Build an iPhone App with PhoneGap

Here’s a great video from Jonathan Stark, showing how you can turn a web app into a native iPhone app with the free tool PhoneGap. When combined with jQTouch, the jQuery plugin for mobile web development, you have a complete system for building native apps for various mobile platforms, all from html, css, and javascript.

PhoneGap supports iPhone, Android, Blackberry, Symbian, and Palm!

[youtube]http://www.youtube.com/watch?v=LcES5nIbMkk[/youtube]

First Time on the Monon Trail

Tonight we decided to ride the Hagan-Burke trail again, but it was flooded not too far south of 146th.

We drove to a Monon Trail parking area on E Greyhound Pass and rode north. The trail was closed just south of 161st. We rode south to Smokey Row / 136th (with a short detour on the Hagan-Burke trail to go down the hill from the Monon trail).

The little dogleg near Rohrer Road is a reminder for us that there’s a parking area there.