![]() Awesome Drop is cool. You want to copy some files to your Android phone, but don’ t have a cable handy. Browse for the Awesome Drop app in the Android Market. Install it an run it. It tells you the URL and code to enter in Chrome on your computer (it uses some HTML 5 features that are probably only in Chrome right now). Drag your files onto the browser window, and they’re automagically transferred to your phone!
Awesome Drop is cool. You want to copy some files to your Android phone, but don’ t have a cable handy. Browse for the Awesome Drop app in the Android Market. Install it an run it. It tells you the URL and code to enter in Chrome on your computer (it uses some HTML 5 features that are probably only in Chrome right now). Drag your files onto the browser window, and they’re automagically transferred to your phone!
Category Archives: tech
Transfer Large Files to Amazon S3
 I didn’t realize until this week that you can’t use the Amazon S3 web console to transfer files larger than about 300 MB into S3. In fact, sometimes files less than 300 MB will fail to transfer.
CloudBerry S3 Explorer is a free tool that lets you transfer files to and from S3, and it works for much larger files, too!
Customizing the DotNetNuke login page
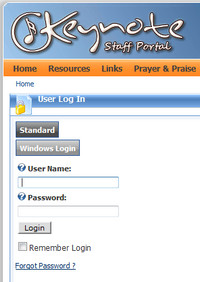 I’ve been wanting to change some things about how our DotNetNuke Intranet site’s login page works, so here’s my record of what I did. I’m mainly writing this so that I’ll be able to reproduce it when I need to.
The default login page is shown at left. I don’t like how the buttons are stacked, I’d like to add some hints for users about how to use the Windows Login, and I’d ideally like people to be able to hit <enter> when they’re using Windows Login. I doubt I’ll figure that last one out before publishing this post. Right now, you can hit <enter> when using the Standard login, but hitting <enter> with Windows Login causes a “Login failed” message. I’m guessing that the <enter> is triggering a hidden Standard login button instead of the visible Windows login button.
Step 1: Create a new login page so that other content can be added more easily
Following the tips at dnngallery.net, I created a new page, added the Account Login module, and changed the Site Settings so that this page is the Login Page for the site.
Step 2: Reformat the login module
Since we’re allowing Standard and Windows logins, we need to edit two different Login.ascx files: one in DesktopModules\AuthenticationServices\DNN, and one in AuthenticationServices\ActiveDirectory. I changed the table width to 240, aligned the Windows login parts to the left to match the Standard login, and added helptext = “” to the labels to get rid of the little help icons (I found that tip here).
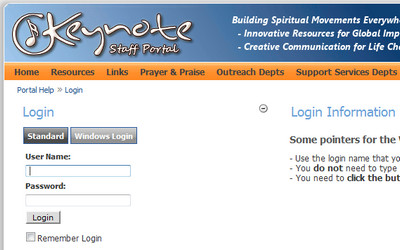
I also wanted it to be more obvious when someone clicked on Windows Login, so I edited AuthenticationServices\ActiveDirectory\App_LocalResources\Login.ascx.resx to change the label on the User Name box to “Keynote User Name” and the label on the button to “Windows Login”.
Step 3: Add other content to the page
I added a text/html module to the page with some login tips.
Here’s the final result:
Media Center 7 “problem†solved
I’m still on the Windows 7 Media Center journey that I started describing earlier. With the addition of an IR Blaster I can now get through the channel setup and record from cable. I don’t see the listings again for my antenna, but that will have to wait.
The latest issue is that it appeared that my Recorded TV was gone. I could see the files through Windows Explorer and even double-click on them to play them, but when I would choose “Recorded TV” in Media Center, it would look like there wasn’t anything there. The error message said “Windows Media Center could not find any shared libraries on your network or there is no content in those libraries …”
I finally realized that the “Sort by” tool at the top had gotten moved to “Shared”. Of course, I don’t have any recorded TV shared from other machines, so the list is blank:
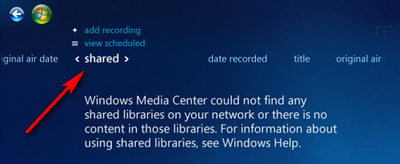
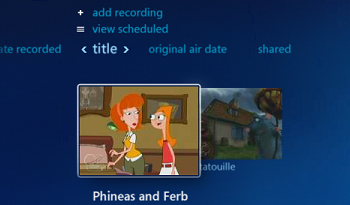
All we had to do was change that indicator at the top to any other sort method, and the programs appeared. Duh!
JW Player, Amazon Cloudfront, and playlists
 [update: JW Player has some nice instructions on how to use the player with CloudFront. But it doesn’t clarify the interaction with playlists…]
I have some flv videos that I need to make available to our staff, and I don’t want to put them on a public site like YouTube. I’m new at hosting streaming videos, and didn’t realize that people won’t be able to skip around in the video unless the server supports RTMP streaming or you figure out “PHP fake streaming”.
Then I found that Amazon CloudFront supports RTMP. It’s pretty easy to set it up, until I started working with playlists. I wanted people to be able to choose between four different videos in a single player. It took quite a bit of experimentation to get the configuration parameters correct. Here are the steps:
- Sign up for Amazon Simple Storage Service (S3), create a “bucket”, and upload your flv videos. Set the permissions on the files to allow everyone to open/download. I also created a folder called “videos” to keep things organized. Let’s assume that we have “video1.flv” and “video2.flv” in the folder “videos”. These files can be accessed with links like
http://s3.amazonaws.com/bucketname/videos/video1.flv
- Get the JW Player and upload the files to your S3 bucket. I put them in a folder called “player”.
- Sign up for Amazon Cloudfront from the AWS console and create a Distribution, Delivery Method = Streaming, that points to your S3 bucket. Your distribution will have a domain name like s1234567890123.cloudfront.net.
- At this point you can test everything by using the JW Player Setup Wizard. Change height and width in “Embed parameters” to match your video. Change file in “File properties” to “videos/video1.flv”. Change streamer in “External Communication” to “rtmp://s1234567890123.cloudfront.net/cfx/st” (note the added “cfx/st”. Now you should be able to click the Update/Preview link and try out your settings. The code can be copied into an html file (like “cloudtest.html”), the html uploaded into the player folder, and then you can browse to
http://s3.amazonaws.com/bucketname/player/cloudtest.html
for the next test.
The next step is to build a playlist file that will let people choose from several videos. The JW Player documentation here shows that you can choose from several XML feed formats. I threw a dart at the wall and chose ATOM. The only information that I wanted to include was the video title and the URL to the flv file. The trick is figuring out what pieces of the RTMP path, file path, and file name go in what places.
Here’s what worked for me. The folder and file name go into the playlist file, along with the “provider” type of rtmp:
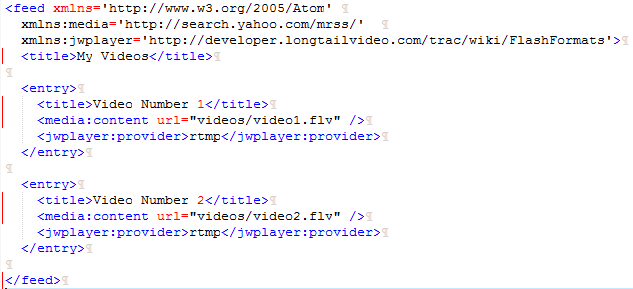
The Amazon CloudFront RTMP path goes into the player configuration in your html file:

Note some other aspects of the html: the height needs to be increased to make room for the playlist. Also, the full path to the playlist needs to be specified.
Hopefully this will help you work through the process faster than I did!
Monitor Your Data Closet Temp on the Cheap
 Check out my first post on ChurchIT: Monitor Your Data Closet Temperature for Under $75.
And check out the rest of the 8BIT Network.
Build an iPhone App with PhoneGap
Here’s a great video from Jonathan Stark, showing how you can turn a web app into a native iPhone app with the free tool PhoneGap. When combined with jQTouch, the jQuery plugin for mobile web development, you have a complete system for building native apps for various mobile platforms, all from html, css, and javascript.
PhoneGap supports iPhone, Android, Blackberry, Symbian, and Palm!
[youtube]http://www.youtube.com/watch?v=LcES5nIbMkk[/youtube]
My Media Center Ordeal (part 1)
 I’ve been running a home-built DVR next to my TV for quite a few years. It ran Windows XP with GBPVR and custom XMLTV scripts to get guide information. It was just what we needed when we had a BUD (Big Ugly Dish), since we could customize the guide for all of the crazy c-band and 4dtv listings.
That machine was too slow to deal with HDTV, so we just bought a Dell Outlet XPS desktop with more/faster/better everything (if you haven’t checked out the Dell Outlet, I recommend it).
So, it should have been as easy as this:
- Install the WinTV-HVR-1600 card (analog and digital tuners) and load the drivers
- Plug the Comcast cable box into the analog tuner and the antenna into the digital tuner
- Plug in the Streamzap remote receiver and load the drivers
- Power it all up, configure the guide in Media Center, and record some TV!
Hah!
The first “gotcha” was the capacitors on the motherboard between the PCI slot and the side of the case. There is so much squeezed onto the WinTV-HVR-1600 card that the caps kept the card from being able to seat in the PCI slot. Hopefully I won’t need the RCA audio in, since I pulled out my soldering iron and removed an audio in jack from the WinTV-HVR-1600. It fit!
The second “gotcha” was the apparent lack of 64-bit drivers for the Streamzap remote that I love (I actually just use the receiver with a Logitech Harmony remote). I emailed Streamzap and started Googling. I was impressed by how quickly they got back to me with these instructions, which I had just found with Google. I knew that 64-bit Windows would be an issue, but so far so good.
The biggest (and not completely solved) frustrations came with the configuration of Windows 7 Media Center. When I told Media Center (MC) that I had an external cable box, it said “I don’t see an IR blaster” and didn’t let me proceed. I don’t care if I have to tune the cable box manually — I just want to record from it once in a while. Why can’t I just tell MC what listings to pull it, and tell it that they’re all on channel 3 on the analog tuner? So I’ve ordered an IR blaster. There is a virtual IR blaster driver out there, but not apparently for 64-bit.
I was able to tell MC that I want to configure the tuners manually and just set up the antenna, but that wasn’t the end of my frustration. Apparently, the “digital terrestrial” lineup just contains one of the channels in the Indianapolis area. How is this possible? To get anything in the guide besides that one channel (which I don’t watch), I had to use the wonderful Guide Tool application from 1geek1tool. This tool let me load the local cable lineup and match the stations to my antenna channels to get at least some listings. Unfortunately, there are quite a few antenna stations available here that the local cable company doesn’t rebroadcast, so I’m still missing a lot of listings. What gives with the lame terrestrial listings in Media Center?
I love the look of Windows 7 Media Center. I love the Internet TV plugin. I love that I can now record and play back HDTV (on the channels that I have listings for). Now I need to wait for the IR blaster to show up, and see if I can find a solution for the over-the-air listing problem.
Many thanks to the people who run Hacking Windows 7 Media Center for all the great tips and utilities, especially the info on Media Center Studio, which lets us tweak the default menus.
Other great resources and answers can be found at The Green Button.
Stay tuned for part 2…
Posting multiple lines to a Google Docs Spreadsheet via the API
 I’ve been writing a perl cgi script to populate a Google spreadsheet, using LWP, the spreadsheet list-based feeds, and the model outlined in the Google article “Using cURL to interact with Google Data Services“.
Everything was working fine until I had an html form with some multiline textarea input fields. I wanted multiple lines of user input to go into a single cell in the Google spreadsheet. When you’re manually entering data into a Google spreadsheet, you just use ctrl-enter to move to the next line inside a cell.
Some documentation said to put a linefeed (ascii 10, or “\n” in perl) between the lines, and it really is that simple. Where I got hung up was in thinking that I already had a linefeed in the form field. It turns out that I had carriage return + linefeed, which the Google spreadsheet API doesn’t like. All you have to do is strip out the carriage return (“\r” in perl) and it will work fine.
I might not have had this problem with browsers running on Mac or linux, but I’m primarily dealing with browsers on Windows.
Cloud Computing Free?
The May issue of Communications of the ACM contained a very interesting article called “Why Cloud Computing Will Never Be Freeâ€. It sometimes reads like an ad for the service that the author’s company offers, but it’s still an in-depth presentation of why the cloud computing price war has resulted in services that cut corners. Buyers beware!