Category Archives: cool tools

Super Screen Capture tool — FastStone Capture

I’ve been creating application documentation lately, and FastStone Capture has been a big help. Previously, I used alt-PrtScn to send a screen capture of the active window to the clipboard, and then pasted it into Paint Shop Pro to edit and crop as necessary. FastStone Capture is more flexible about what part of the screen it captures (even capturing scrolling windows), and then it sends the capture immediately to an editor that lets you easily crop and save. It even comes up with a date-based filename.

It’s free–check it out! Apparently not free anymore, but still a great tool (October 5, 2007)

Free tools that people have told me about (January, 2009):

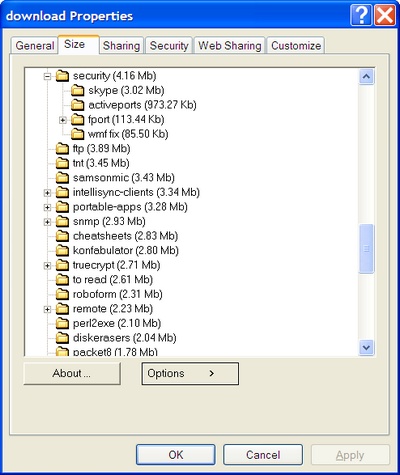
Folder Size Shell Extension

Folder Size Shell Extension utility

It can be a struggle to figure out where all the space has gone on your hard drives. This is a handle little utility that adds a “size” tab to the properties page of Windows Explorer. Just right-click on a folder, choose Properties, click the Size tab, and you’ll see how much space is taken up by each of your folders and its subfolders and files. Use the Options button to sort by size.

This is not as pretty as the graphical output that you get from a utility like TreeSize, but it’s nice that it’s integrated with Windows Explorer.

This utility can be found at many file download sites, including here.

Free archive utility: IZArc

It’s been a while since I looked for a good, free file zipper and unzipper for Windows.

If you need one, check out IZArc. It handles all of the file types that I ever need to work with. Here’s the feature list from the web site–check it out!

  • Create an archive
  • Add files to an existing archive
  • Delete files from an existing archive
  • Extract files from an existing archive
  • Test an archive file
  • Convert archive
  • Convert CD Images
  • Repair broken archive
  • Searching for any files in many archives
  • Favorite Folders
  • Obtaining a detailed list of files and information like compression rate, path, or size from an archive file
  • Supports both long and short 8.3 filenames
  • Disk spanning from and to multiple diskettes or other removable media
  • Implementing the possibility to sort the list items by name size, date and etc.
  • Full Drag & Drop support
  • CD/DVD Images support (ISO, BIN, MDF, NRG, IMG, C2D, PDI, CDI)
  • Integrating in Windows Explorer context menu
  • Automatic installation of most software distributed in archive files
  • Add/View comments in an archive
  • By double-clicking onto a file in the file list, it’s opened with the program associated to this file type
  • CheckOut feature
  • Create a self-extracting archive
  • E-mail an archive
  • Checking for new updates
  • Built-in multilanguage support
  • Virus Scan feature
  • UU/XX/MIME Encode/Decode
  • Create Multi-Volume Set
  • Merge Multi-Volume Set
  • UnSFX (Convert self-extracting (SFX) .EXE files to standard archives)
  • Encrypt files using Rijandael – AES (256-bits) encryption
  • Zip encryption (WinZip 9 compatible)
  • BZip compression for ZIP archives
  • Decrypt (.ize) files

Installing Cacti on CentOS with yum

I’ve been wanting to try the Cacti network graphing system for a while, but wasn’t sure how much effort it would take. Well, it wasn’t too bad, and here are the steps that I used. Hopefully this will save someone else a few minutes.I started with the CentOS 4.3 Server CD. I really like having a single CD that will install what’s necessary for a server. I use the .iso and VMWare Server, and can have a server installed from scratch in very little time. For this server, I chose to customize the list of packages. I unchecked Mail Server, Windows File Server, DNS Name Server, FTP Server, and Printing Support. I added System Tools. I’ll assume that you have your OS installed at this point.

Configure yum. Since I want to use yum as much as possible, and cacti is not in the default CentOS repositories, I added Dag to my list of repositories. This is as simple as creating the file /etc/yum.repos.d/Dag.repo and putting the following in it:

[dag]
name=Dag RPM Repository for Red Hat Enterprise Linux
baseurl=http://apt.sw.be/redhat/el$releasever/en/$basearch/dag
gpgcheck=0
enabled=1
protect=0

That last option (“protect=0”) only does anything if you’ve installed the ProtectBase plugin for yum. This plugin keeps yum from updating system or base packages from non-CentOS repositories (or however you want to configure it). You can read about it here.

Continue reading

AI Roboform is awesome!

I recently started using Roboform for filling out forms online and logging into web sites and applications. Here’s a few of the things it does for me that I really like:

  • When I go to a web page that wants me to fill in contact information (name, address, email, age, sex, company name, etc), Roboform fills most of the fields in automatically. Plus, I can choose from various “identities”, like “Karl office” (which fills in my office email and mailing addresses) and “Karl personal” (which fills in personal info). All of this information is stored by Roboform on my computer in encrypted form, protected by a single master password (I have a long passphrase set). You set the timeout for the master password (2 hours is default).
  • Whenever I log into a web site (bank, library, tech support sites …), Roboform asks if I want it to save the name and password information in a “passcard”. These are also encrypted by the master password. From then on, whenever I go to those sites, the Roboform toolbar in IE and Firefox lets me login with a click. Roboform will also generate random passwords if you want it to for new logins that you’re creating.
  • Now when I want to login to any of those web apps, I don’t even need to open a browser. There’s a Roboform icon in the tray that will launch the browser, navigate to the site, and login. See the graphic below (which is edited to blank out private info). This is my favorite feature. I haven’t figured out how to tell it to launch IE for certain sites (Firefox is my default browser), so I launch IE first and then use the IE toolbar icon for sites that require IE.

Continue reading