 [update: JW Player has some nice instructions on how to use the player with CloudFront. But it doesn’t clarify the interaction with playlists…]
I have some flv videos that I need to make available to our staff, and I don’t want to put them on a public site like YouTube. I’m new at hosting streaming videos, and didn’t realize that people won’t be able to skip around in the video unless the server supports RTMP streaming or you figure out “PHP fake streaming”.
Then I found that Amazon CloudFront supports RTMP. It’s pretty easy to set it up, until I started working with playlists. I wanted people to be able to choose between four different videos in a single player. It took quite a bit of experimentation to get the configuration parameters correct. Here are the steps:
- Sign up for Amazon Simple Storage Service (S3), create a “bucket”, and upload your flv videos. Set the permissions on the files to allow everyone to open/download. I also created a folder called “videos” to keep things organized. Let’s assume that we have “video1.flv” and “video2.flv” in the folder “videos”. These files can be accessed with links like
http://s3.amazonaws.com/bucketname/videos/video1.flv
- Get the JW Player and upload the files to your S3 bucket. I put them in a folder called “player”.
- Sign up for Amazon Cloudfront from the AWS console and create a Distribution, Delivery Method = Streaming, that points to your S3 bucket. Your distribution will have a domain name like s1234567890123.cloudfront.net.
- At this point you can test everything by using the JW Player Setup Wizard. Change height and width in “Embed parameters” to match your video. Change file in “File properties” to “videos/video1.flv”. Change streamer in “External Communication” to “rtmp://s1234567890123.cloudfront.net/cfx/st” (note the added “cfx/st”. Now you should be able to click the Update/Preview link and try out your settings. The code can be copied into an html file (like “cloudtest.html”), the html uploaded into the player folder, and then you can browse to
http://s3.amazonaws.com/bucketname/player/cloudtest.html
for the next test.
The next step is to build a playlist file that will let people choose from several videos. The JW Player documentation here shows that you can choose from several XML feed formats. I threw a dart at the wall and chose ATOM. The only information that I wanted to include was the video title and the URL to the flv file. The trick is figuring out what pieces of the RTMP path, file path, and file name go in what places.
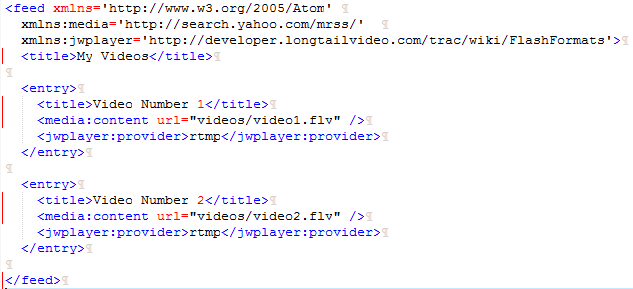
Here’s what worked for me. The folder and file name go into the playlist file, along with the “provider” type of rtmp:

The Amazon CloudFront RTMP path goes into the player configuration in your html file:

Note some other aspects of the html: the height needs to be increased to make room for the playlist. Also, the full path to the playlist needs to be specified.
Hopefully this will help you work through the process faster than I did!
 I didn’t realize until this week that you can’t use the Amazon S3 web console to transfer files larger than about 300 MB into S3. In fact, sometimes files less than 300 MB will fail to transfer.
 [update: JW Player has some
