Category Archives: windows

DotNetNuke Active Directory Login Error

DotNetNukeThanks to some people on the DNN Forums, I discovered that the Windows login error “Login Failed. Please remember that passwords are case sensitive” can also mean “you typed your Windows password correctly, but it’s shorter than the DNN default minimum password length of 7”.

The situation was confusing, because some people could log in with their Windows credentials, but others couldn’t.

Either ask your user to change their password to something at least 7 characters long (which is obviously the right way to go), or change the default minimum password length in web.config.  The parameter there is “minRequiredPasswordLength”.

Customizing the DotNetNuke login page

I’ve been wanting to change some things about how our DotNetNuke Intranet site’s login page works, so here’s my record of what I did.  I’m mainly writing this so that I’ll be able to reproduce it when I need to.

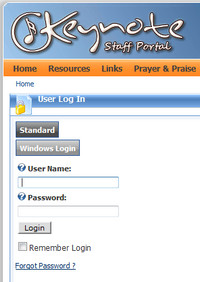
The default login page is shown at left.  I don’t like how the buttons are stacked, I’d like to add some hints for users about how to use the Windows Login, and I’d ideally like people to be able to hit <enter> when they’re using Windows Login.  I doubt I’ll figure that last one out before publishing this post.  Right now, you can hit <enter> when using the Standard login, but hitting <enter> with Windows Login causes a “Login failed” message.  I’m guessing that the <enter> is triggering a hidden Standard login button instead of the visible Windows login button.

Step 1: Create a new login page so that other content can be added more easily

Following the tips at dnngallery.net, I created a new page, added the Account Login module, and changed the Site Settings so that this page is the Login Page for the site.

Step 2: Reformat the login module

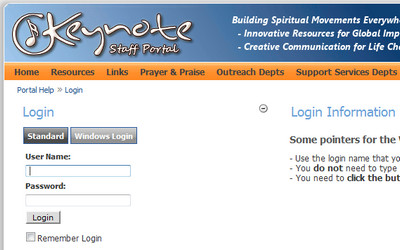
Since we’re allowing Standard and Windows logins, we need to edit two different Login.ascx files: one in DesktopModules\AuthenticationServices\DNN, and one in AuthenticationServices\ActiveDirectory.  I changed the table width to 240, aligned the Windows login parts to the left to match the Standard login, and added helptext = “” to the labels to get rid of the little help icons (I found that tip here).

I also wanted it to be more obvious when someone clicked on Windows Login, so I edited AuthenticationServices\ActiveDirectory\App_LocalResources\Login.ascx.resx to change the label on the User Name box to “Keynote User Name” and the label on the button to “Windows Login”.

Step 3: Add other content to the page

I added a text/html module to the page with some login tips.

Here’s the final result:

Media Center 7 “problem” solved

I’m still on the Windows 7 Media Center journey that I started describing earlier.  With the addition of an IR Blaster I can now get through the channel setup and record from cable.  I don’t see the listings again for my antenna, but that will have to wait.

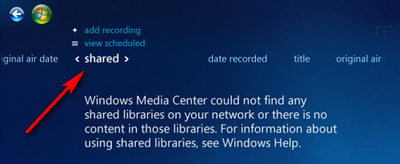
The latest issue is that it appeared that my Recorded TV was gone.  I could see the files through Windows Explorer and even double-click on them to play them, but when I would choose “Recorded TV” in Media Center, it would look like there wasn’t anything there.  The error message said “Windows Media Center could not find any shared libraries on your network or there is no content in those libraries …”

I finally realized that the “Sort by” tool at the top had gotten moved to “Shared”.  Of course, I don’t have any recorded TV shared from other machines, so the list is blank:

MC Error

All we had to do was change that indicator at the top to any other sort method, and the programs appeared.  Duh!

MC Sorting

My Media Center Ordeal (part 1)

I’ve been running a home-built DVR next to my TV for quite a few years.  It ran Windows XP with GBPVR and custom XMLTV scripts to get guide information.  It was just what we needed when we had a BUD (Big Ugly Dish), since we could customize the guide for all of the crazy c-band and 4dtv listings.

That machine was too slow to deal with HDTV, so we just bought a Dell Outlet XPS desktop with more/faster/better everything (if you haven’t checked out the Dell Outlet, I recommend it).

So, it should have been as easy as this:

  1. Install the WinTV-HVR-1600 card (analog and digital tuners) and load the drivers
  2. Plug the Comcast cable box into the analog tuner and the antenna into the digital tuner
  3. Plug in the Streamzap remote receiver and load the drivers
  4. Power it all up, configure the guide in Media Center, and record some TV!

Hah!

The first “gotcha” was the capacitors on the motherboard between the PCI slot and the side of the case.  There is so much squeezed onto the WinTV-HVR-1600 card that the caps kept the card from being able to seat in the PCI slot.  Hopefully I won’t need the RCA audio in, since I pulled out my soldering iron and removed an audio in jack from the WinTV-HVR-1600.  It fit!

The second “gotcha” was the apparent lack of 64-bit drivers for the Streamzap remote that I love (I actually just use the receiver with a Logitech Harmony remote).  I emailed Streamzap and started Googling.  I was impressed by how quickly they got back to me with these instructions, which I had just found with Google.  I knew that 64-bit Windows would be an issue, but so far so good.

The biggest (and not completely solved) frustrations came with the configuration of Windows 7 Media Center.  When I told Media Center (MC) that I had an external cable box, it said “I don’t see an IR blaster” and didn’t let me proceed.  I don’t care if I have to tune the cable box manually — I just want to record from it once in a while.  Why can’t I just tell MC what listings to pull it, and tell it that they’re all on channel 3 on the analog tuner?  So I’ve ordered an IR blaster.  There is a virtual IR blaster driver out there, but not apparently for 64-bit.

I was able to tell MC that I want to configure the tuners manually and just set up the antenna, but that wasn’t the end of my frustration.  Apparently, the “digital terrestrial” lineup just contains one of the channels in the Indianapolis area.  How is this possible?  To get anything in the guide besides that one channel (which I don’t watch), I had to use the wonderful Guide Tool application from 1geek1tool.  This tool let me load the local cable lineup and match the stations to my antenna channels to get at least some listings.  Unfortunately, there are quite a few antenna stations available here that the local cable company doesn’t rebroadcast, so I’m still missing a lot of listings.  What gives with the lame terrestrial listings in Media Center?

I love the look of Windows 7 Media Center.  I love the Internet TV plugin.  I love that I can now record and play back HDTV (on the channels that I have listings for).  Now I need to wait for the IR blaster to show up, and see if I can find a solution for the over-the-air listing problem.

Many thanks to the people who run Hacking Windows 7 Media Center for all the great tips and utilities, especially the info on Media Center Studio, which lets us tweak the default menus.

Other great resources and answers can be found at The Green Button.

Stay tuned for part 2…

iTunes lost my music library

Hoping that this will help someone who experiences this in the future, I thought I’d briefly write up what happened when I switched my Windows machine from one domain to another, and my iTunes library disappeared.

What happened: My machine had been a member of domain A, and I had redirected “My Documents” and all of its subfolders (noteably “My Music”) to D:\MyDocuments. My iTunes music was in d:\MyDocuments\My Music\iTunes\iTunes Music and the corresponding .itl and .xml files were right above that in d:\MyDocuments\My Music\iTunes.

I moved my computer to domain B, knowing that I would get a new profile and a lot of cleanup work. I should have remapped My Documents right away, but I didn’t. I ran iTunes, and it had to do some reinstallation under the new user profile. It finally opened, showing an empty music library.

After reading some articles online, I thought I could go into Preferences, Advanced tab, and just point iTunes to d:\MyDocuments\My Music\iTunes\iTunes Music. All of the documentation seems to indicate this, but it doesn’t work. It turns out that the pointer in the Advanced tab probably only tells iTunes to look there for the music, but not for the .itl and .xml files that describe the library. iTunes was still looking in my new profile path at a blank set of those files Of course, it took me hours to figure that out.

There are probably two solutions: move the correct .itl and .xml files to the new profile path, or repoint My Documents again so that iTunes finds the existing files in d:\MyDocuments\My Music\iTunes. I chose the second, and it worked well.

By the way, I couldn’t remember how I’d originally remapped My Documents, so I downloaded TweakUI. The only downside was that TweakUI has you individually map My Documents, My Music, My Pictures, etc. The method that I’d used before mapped them all when you remapped My Documents.

PureText: Paste Plain Text!

The utility that I’ve needed for years and finally looked for: PureText.

So many times I copy text from a web page or other document and need to paste it into an application that doesn’t offer the “Paste Special” option. I just want the text, not the formatting.

PureText lets you create a shortcut key (Windows-V by default) that will paste just the plain text from the clipboard.

Update (12/4/2012):
Now that I’m using a Mac most of the time, I use “Plain Clip” every day. I just copy some text, click once on the Applications stack in the dock, then type “plai” and hit enter to clear the formatting out of the clipboard. I’m sure there’s a quicker way, but that’s my habit now.

Redirecting stdout and stderr in a batch file

One thing that I constantly need and can never remember the syntax for is redirecting stdout and stderr in a Windows batch file or cmd script (actually, the syntax is pretty much the same for *nix shell scripts).

Rather than just a one-sentence note here to remind me, I’ll write a few more sentences as explanation. Hopefully this will save someone a little bit of time

For starters, you can redirect the output of a command to a file like so:

blah.exe > output.txt

That example will overwrite any pre-existing output.txt file. If you want to append to the file, use:

blah.exe >> output.txt

But this only redirects “standard output” (stdout). If your program encounters an error, the output generated by the error condition probably won’t show up in the file. If you want it to show up in the file, redirect “standard error” (stderr) also like so:

blah.exe 2>&1 output.txt

At the moment, I can’t tell you if that will append or overwrite. I’ll check that out and update the post…